PNG images are widely used on websites because they support transparency and high-quality visuals. However, PNG files can be much larger than necessary, which can slow down your website and impact performance.
One of the easiest ways to reduce image file size is to convert PNG images to WebP.
In this guide, you’ll learn how to convert PNG to WebP and why switching formats can significantly improve website performance.
How can I compress images from PNG to WebP? You can simply upload your PNG file to a WebP optimizer, which will automatically convert and compress the image. Then download the optimized file for use on your website – reducing file size while maintaining visual quality.
Why convert PNG to WebP?
If you’re using PNG images on your website, you’re often serving more data than necessary. Converting PNG to “next gen” formats like WebP often helps you deliver the same visuals with smaller file sizes.
WebP achieves this through more efficient compression, often reducing image size by 30% compared to PNG at similar quality levels.
This reduction has a direct impact on performance:
Faster page load times
Improved Core Web Vitals by using next-gen formats
Better mobile experience
Lower bandwidth usage
Stronger SEO performance
For websites with many images, switching from PNG to WebP is one of the simplest ways to improve speed without reworking your visuals.
That said, WebP is not always smaller than PNG. File size depends on the image itself. Simple graphics or already optimized PNGs can sometimes be just as small or smaller.
The advantage is that tools like Tinify automatically compare and optimize your images. You can convert to WebP and compress the PNG at the same time, and Tinify shows you which option gives the best result.
PNG vs WebP: What’s the difference?
PNG and WebP are both widely used image formats, but they serve different purposes.
Feature
PNG
WebP
Compression type
Lossless only
Lossy and lossless
File size
Larger
Smaller
Transparency
Yes
Yes
Image quality
Perfect (no data loss)
High (optimized for web)
Best use cases
Logos, icons, UI elements
Most image types
Browser support
Universal
All modern browsers
Since WebP supports both lossy and lossless compression, it can be used for a wide range of image types. It is designed for web performance, using efficient compression techniques to reduce file size while maintaining visual quality. If you want a deeper breakdown, see our guide on the pros and cons of WebP images.
That said, PNG is still preferred in some design workflows where exact visual precision is required. Because PNG preserves all image data, it’s ideal for design assets and graphics, but this also results in larger file sizes.
Common use cases for WebP
WebP is especially useful for:
E-commerce product images
Blog content and featured images
Landing pages and marketing visuals
Background images and hero banners
Reducing image weight in these areas improves both user experience and performance metrics.
How to compress PNG to WebP
You can compress and convert PNG images to WebP in just a few steps using a PNG to WebP converter like Tinify.
1. Upload your PNG images
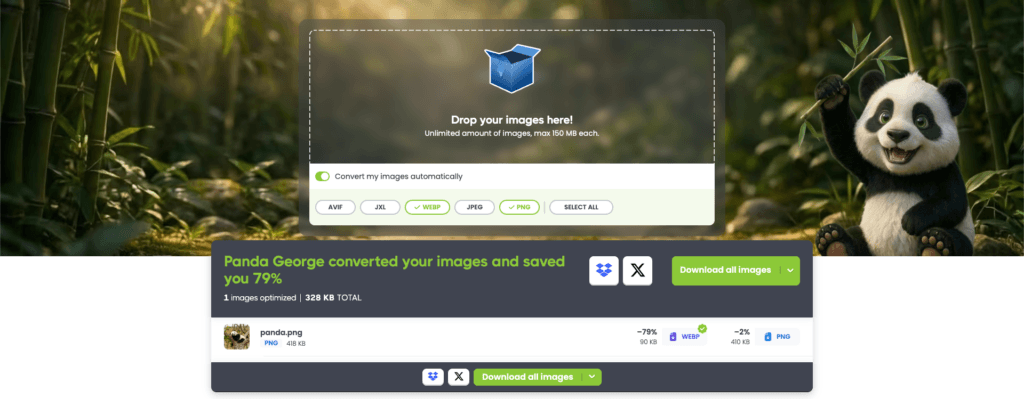
Drag and drop your images into the image optimizer or select them from your device. No installation or account is required.
2. Automatically convert and compress
Our free image converter is designed for simplicity, automatically serving as both a PNG compressor and a WebP converter. It applies PNG compression and simultaneously converts your PNG to WebP.
George the Panda saves you 79% by converting PNG to WebP.
3. Download optimized images
Download your compressed WebP images to your device or to your Dropbox.
You can also batch convert multiple images at once, making it easy to optimize entire websites or image libraries.
Compress and convert your images in seconds
Reduce PNG file size and convert to WebP in just a few clicks. Save up to 80% without losing quality.
If you’re deciding between PNG and WebP, the choice usually comes down to performance versus precision.
Choose WebP for:
Website images and content visuals
Product images
Blog posts
Backgrounds and banners
Stick with PNG when:
You need pixel-perfect editing
You work with design tools that require PNG
Frequently asked questions
01. Does converting PNG to WebP reduce quality? Tinify’s smart image compression reduces file size while keeping images visually identical to the human eye.
03. Can I convert multiple PNG files at once? Yes, Tinify’s image converter supports batch processing, allowing you to optimize multiple images quickly.
Start converting PNG images to WebP today
Optimizing your images is one of the fastest ways to improve website performance.
By converting PNG to WebP, you can reduce file sizes, improve loading speed, and create a better user experience. Want to go further? Automate optimization with an image optimization API or deliver images faster worldwide using an image CDN.
Learn how to compress images online without losing quality. This step by step guide shows how to reduce image file sizes, improve website speed, and optimize images easily using modern compression tools like Tinify.
Updating a business website usually happens in pieces. A new page here. A refreshed banner there. Maybe a blog post that finally gets the visuals it deserves. Over time, those small updates shape how the site feels—but without a clear process, they can also introduce inconsistency and unnecessary friction.
That’s why Adobe Express and Tinify work well together during website updates. Adobe Express supports visual creation and consistency. Tinify supports a simple, repeatable preparation step before images go live. Together, they help website updates feel more intentional and easier to manage.
The Short Version
Create visuals with consistency in mind. Finalize them once. Prepare images before uploading. Publish without second-guessing. That rhythm is what keeps website updates from turning into ongoing cleanup.
How to Think About Website Updates Before You Open Any Tools
Most website refreshes feel frustrating because teams jump straight into execution. Pages are edited while visuals are still in flux. Images are uploaded before decisions are final.
The result isn’t bad work. It’s unnecessary churn.
A more structured approach starts by deciding when each type of work happens. Visual creation should have a clear beginning and end. Publishing should come later, once decisions are locked. When those phases are separated, tools stop competing with each other and start supporting a cleaner flow.
This is less about speed and more about reducing backtracking.
Where Adobe Express Supports Website Updates
Adobe Express is typically used during the creative phase of website updates, when visuals are being created, adjusted, and finalized.
In practice, it’s used to support common update tasks like:
Keeping creative work in one place makes it easier to maintain a consistent look and feel across the site as updates roll out over time.
This creative layer is where visual decisions are made and assets are finalized. Once visuals are approved, the next step is preparing image files for optimal performance on live websites.
Where Tinify Naturally Comes Into The Workflow
Tinify fits in after visuals are complete. Once images are finalized and approved for use, Tinify provides a consistent way to prepare those files for the web before they’re uploaded to a website, blog, or CMS.
Tinify reduces image file size without affecting visual quality or design decisions. This helps pages load faster, improving the experience for visitors and supporting SEO over time, since page speed is one of the factors search engines consider.
How teams use Tinify depends on their setup:
Manual compression: Upload images directly to Tinify before adding them to a website.
WordPress plugin: Automatically compress images when they’re uploaded to the media library, so every image follows the same preparation step without manual checks.
Used consistently, Tinify becomes a quiet part of the routine. It’s not a tool teams debate or revisit. It’s a dependable final step before publishing that helps updates feel finished rather than rushed.
Common Friction Points During Ongoing Updates
When websites are updated over months or years, a few issues tend to surface:
Visuals look good individually, but feel mismatched together.
Blog graphics don’t resemble the rest of the site.
Homepage elements are updated often but inconsistently.
Images are uploaded without being optimized for performance.
Individually, none of these issues breaks a website. But over time, they create unnecessary follow-up work and make updates feel more complicated than they need to be.
A Practical Workflow to Handle Website Updates
Rather than treating every change like a redesign, many businesses follow a repeatable rhythm:
Create or revise visuals in Adobe Express so they match current branding and layout goals.
Finalize assets once they’re approved for real use—not drafts.
Prepare finalized images with Tinify before uploading them to the site.
Publish updates with fewer revisions and fewer follow-ups.
This flow supports steady improvement without disruption.
Frequently Asked Questions (FAQs)
Is this workflow only for designers? Not at all. It’s often used by marketing and content teams managing incremental updates like new pages, blog posts, or homepage changes.
Does Tinify change how images look? No. Tinify reduces file size while preserving visual quality, so design and branding decisions stay exactly as intended.
Photo by Pascal Müller on Unsplash
Will this help with long-term consistency? Yes. Using the same creation and preparation steps for every update helps teams maintain both visual consistency and site performance over time.
Smarter website updates don’t come from doing more—they come from doing things in the right order. Adobe Express supports the creative work of keeping visuals consistent and current. Tinify supports the final preparation step that makes those visuals ready for the web. Used together, they help website updates feel calmer, cleaner, and easier to repeat over time.
A fast-loading website is more important than ever. It leads to more conversions and a better user experience. Compressed images have a big influence on that. If you have a WordPress website and want to speed up loading times, the TinyPNG WordPress plugin might be helpful. But what exactly is this image compression plugin and how can you speed up your WordPress website by compressing your pictures?
Why compress images?
Optimizing the size of your images is crucial for ensuring a fast and efficient website. Large image files are one of the biggest reasons behind slow websites as many website owners overlook the size of their images when they upload them into their WordPress websites. While they may look good on the page, this isn’t enough to guarantee the best user experience.
At the same time, the size of your images impacts your SEO, as faster websites rank higher in search results, which results in more visitors and conversions.
Some experts recommend that your images shouldn’t be more than 1MB, but Shopify advises users to keep image files under 70KB.
Additionally, as a rule of thumb, your website shouldn’t take more than 3 seconds to load as 40% of users will immediately leave it.
Before you keep on reading, you can use Tinify’s Analyzer to discover how much time you can save on page loading by compressing your images.
Does WordPress automatically compress images?
You might be wondering, does WordPress automatically compress images? The answer is yes, but only to a certain extent. WordPress does compress pictures upon upload, but this default compression might not be sufficient for optimal performance and could make images blurry. To prevent this, an image compression plugin comes in handy.
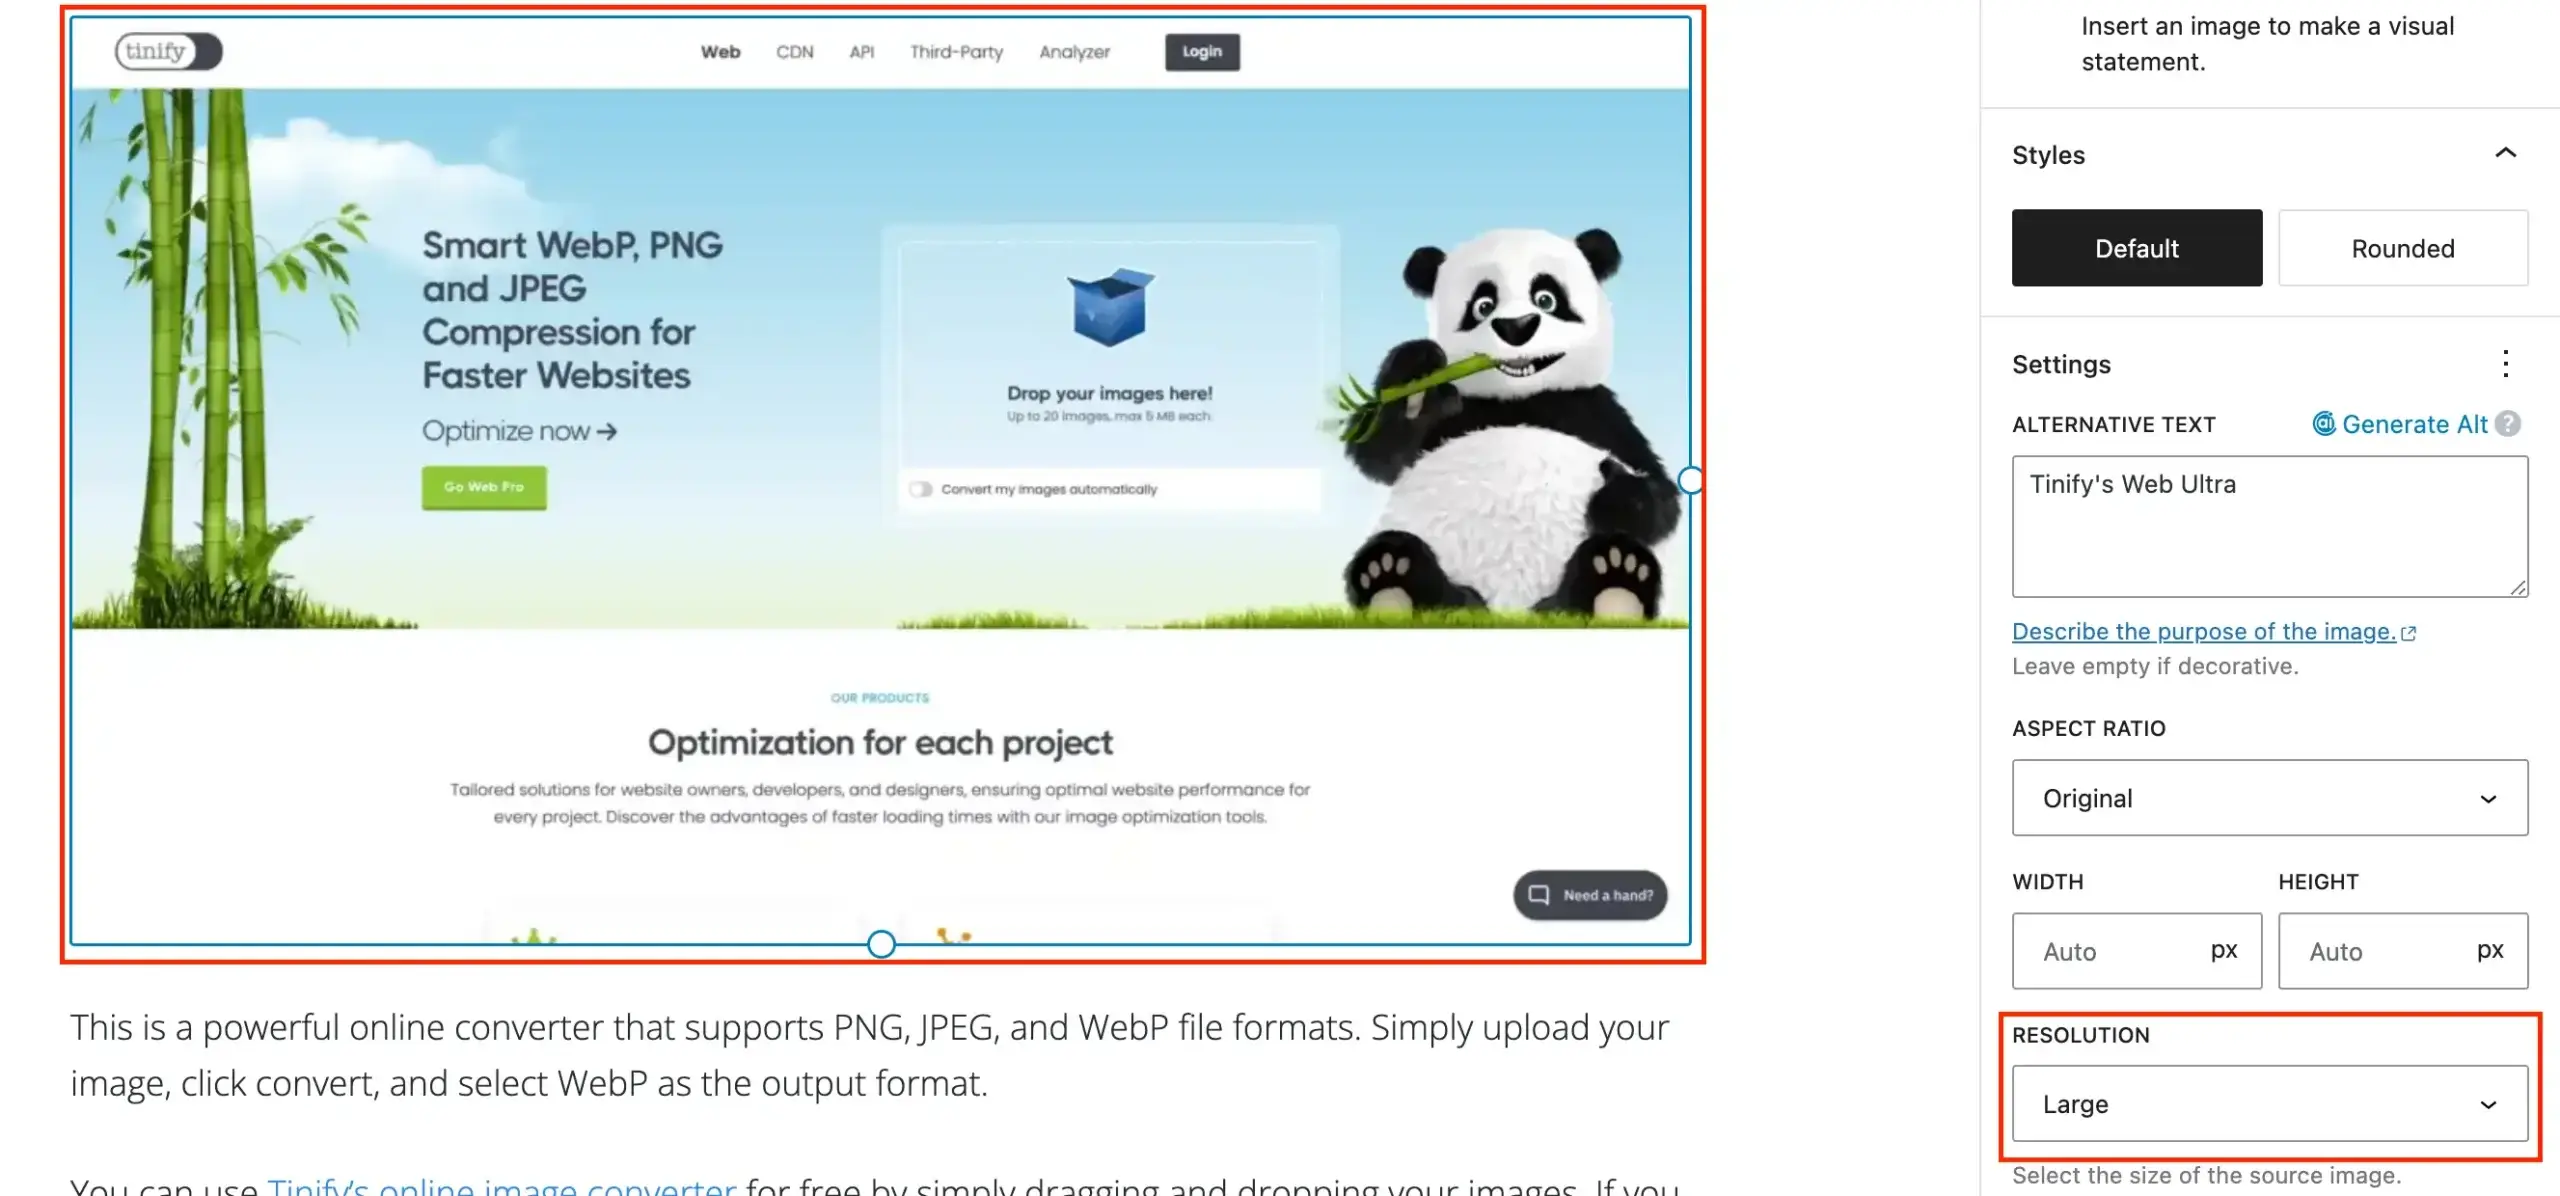
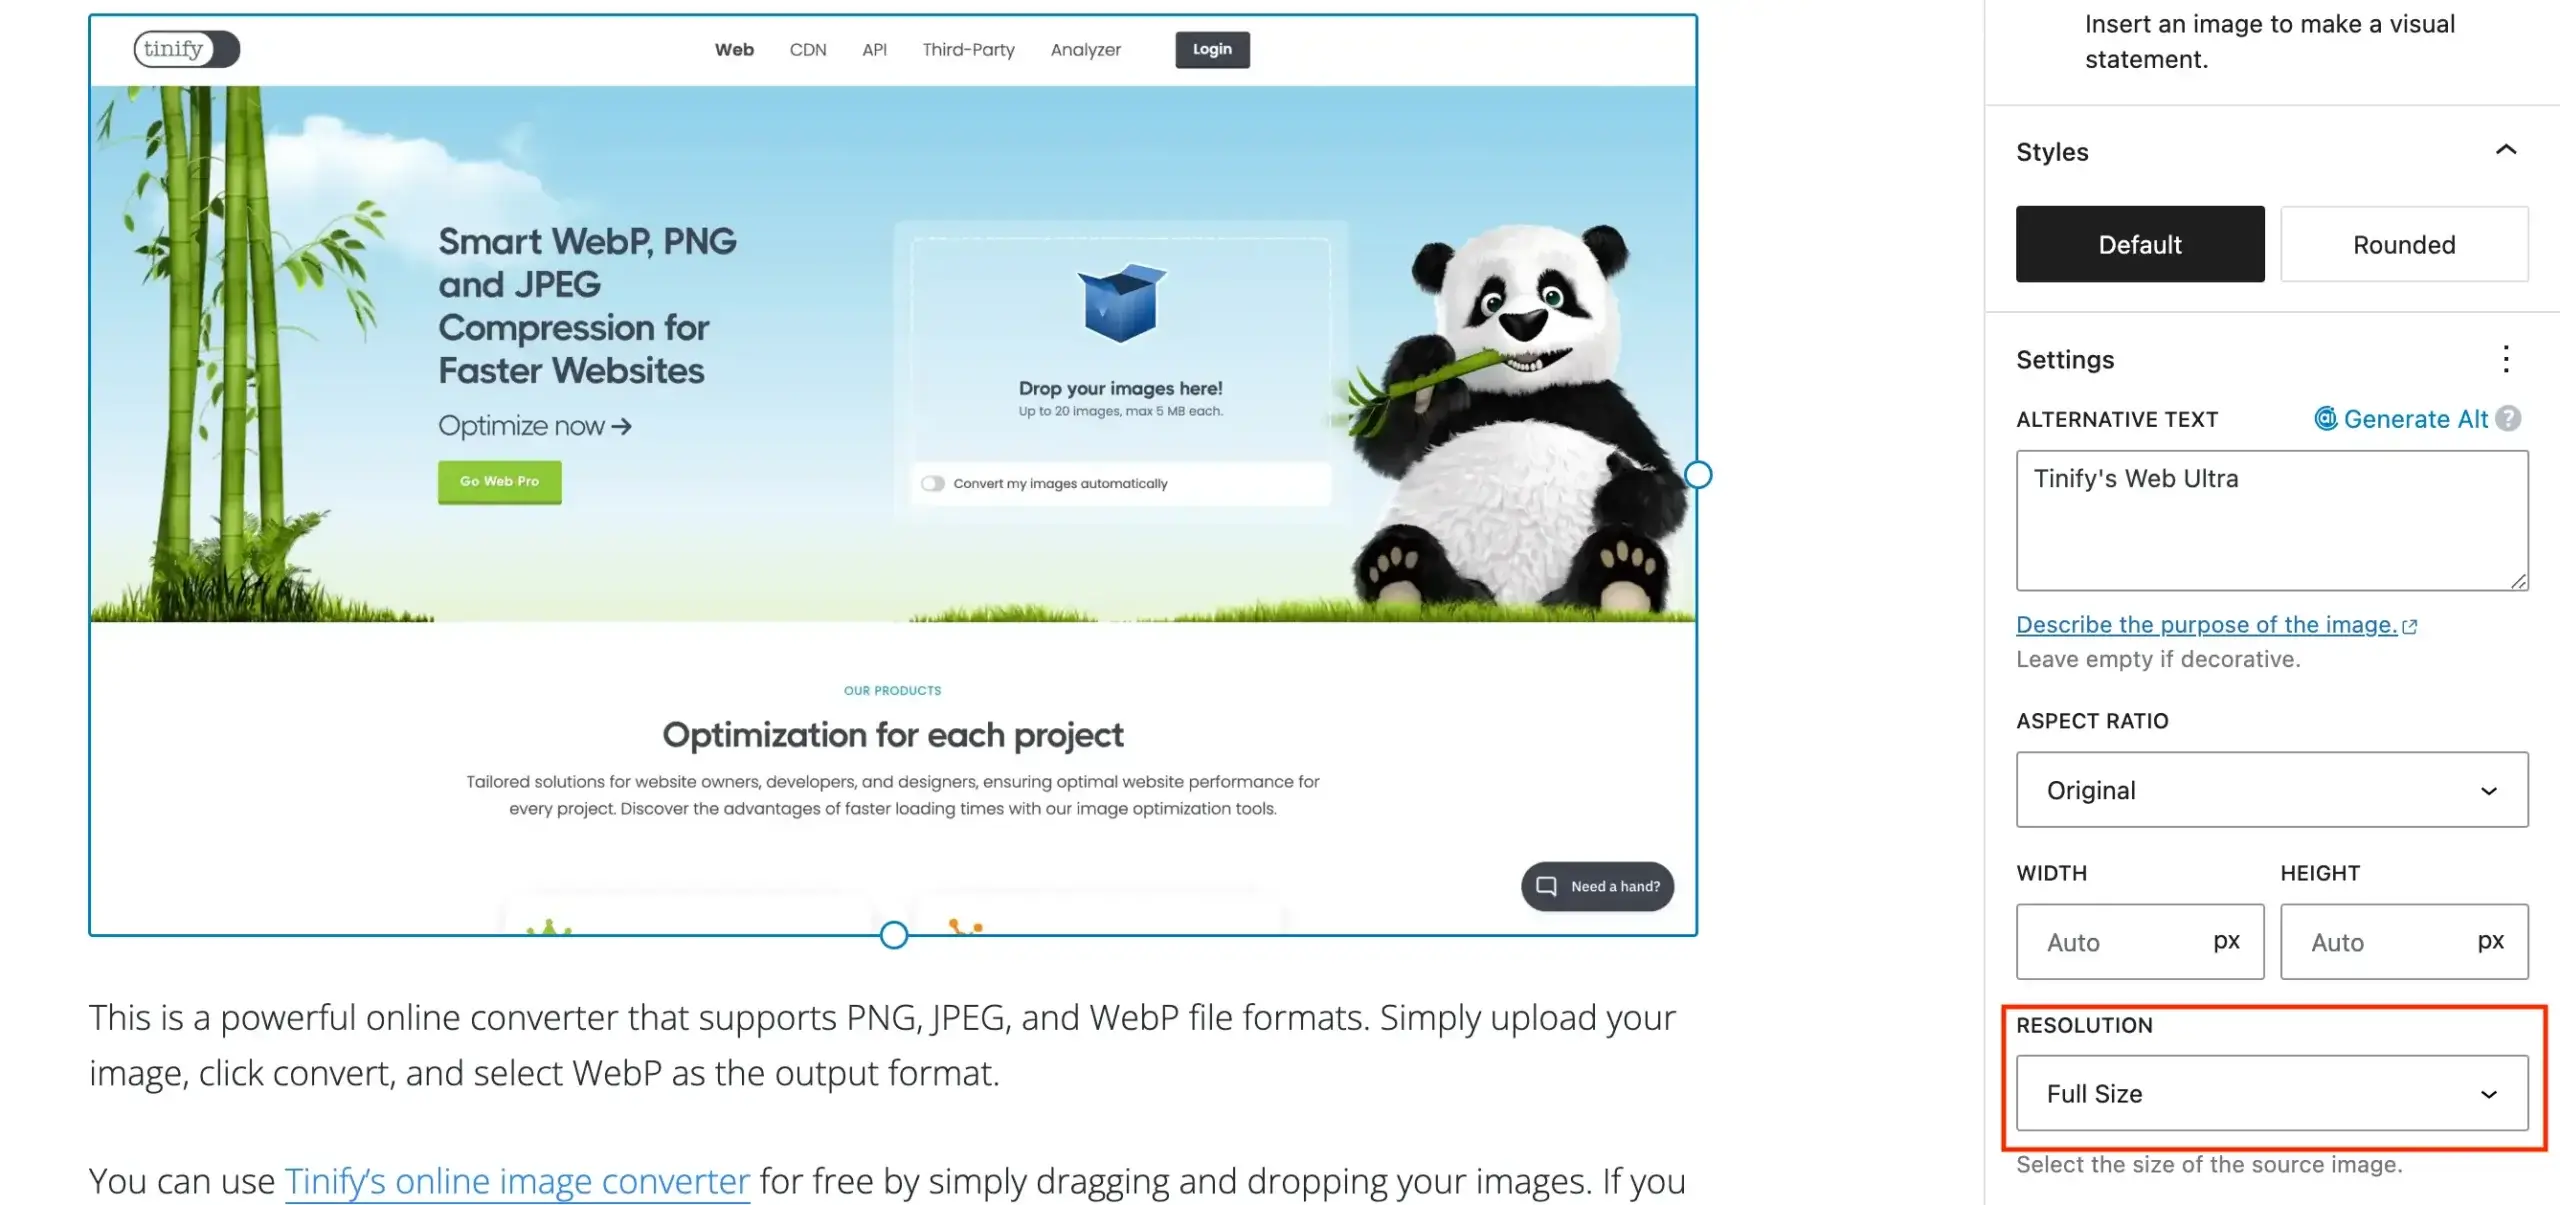
The image on the right illustrates how WordPress automatically reduces the size of your uploaded pictures by changing the resolution to “Large.” However, this makes the image look quite blurry. If you choose “Full size,” you will notice a clear difference. In this way, a better solution is to select “Full Size” and use a specific image compression plugin to maintain high quality.
Why use an image compression plugin for WordPress?
Having a lot of images on your website takes time to load. A simple way to decrease the loading time of your website is to compress images. An image compression plugin for WordPress can further reduce the file sizes of your images beyond the default compression WordPress provides. This ensures your website loads quickly, improving both SEO and user experience.
Your website’s images are compressed through Tinify’s API service to reduce file sizes. The optimization process is tailored to each image, ensuring the best results. Once compressed, the smaller images are sent back to your WordPress site, replacing the originals.
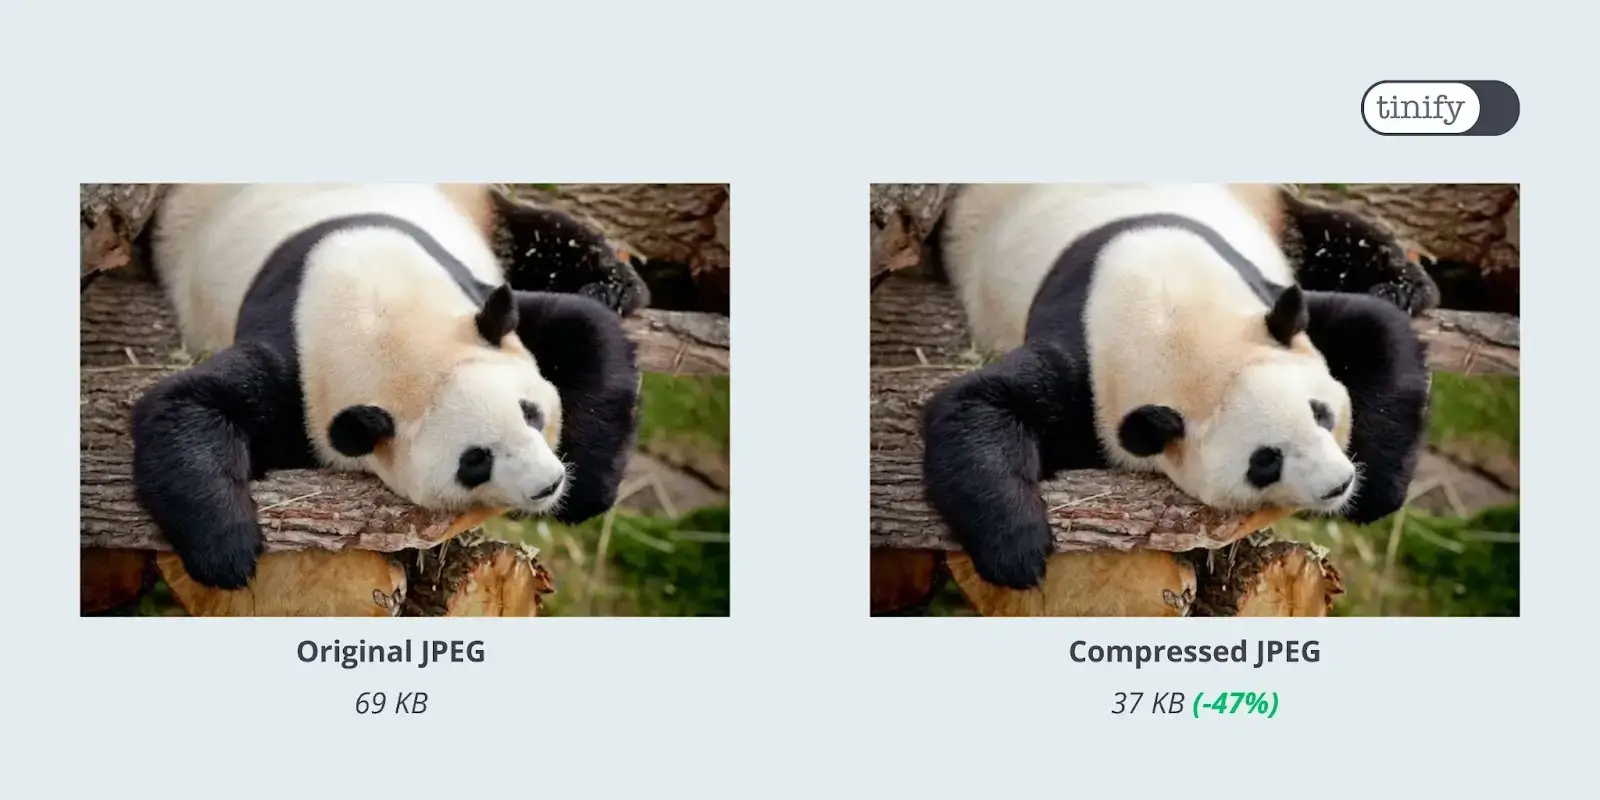
On average, JPEG images are compressed by 40-60% and PNG images by 50-80% with no visible quality loss. This leads to faster loading times and significant savings in storage space and bandwidth. Every day, roughly three million images are optimized by Tinify!
How to compress images in WordPress
The TinyPNG WordPress plugin allows you to reduce the size of images using the Bulk Optimization tool or by manually selecting them.
Additionally, it offers 3 options for handling newly optimized images: optimize after upload, optimize during upload, or not compress at all. The last option is ideal for website development to avoid unnecessary compressions.
The image compression plugin allows you to compress 500 images each month for free. The exact total depends on the number of thumbnail sizes that are in use in your WordPress installation. That means that with a standard WordPress installation, you can optimize roughly 100 images each month for free.
Features of TinyPNG’s image compression plugin for WordPress
Optimize images as you upload them
Improve single images in your media library
Quickly optimize all images in your library
Resize large images upon upload for better display
Speed up JPEG image loading with progressive encoding
Keep copyright info and other data in original images
Compress animated PNG files
Pick which image sizes to optimize
If you’re looking for a straightforward solution, the TinyPNG WordPress plugin is the way to go. According to our users, TinyPNG is easier to use than other plugins. “It does the job” is common feedback – that and “I love the panda!”. Moreover, users appreciate the convenience of avoiding subscriptions in case they surpass the free monthly limit of 500 compressions. Instead, they can easily pay for additional images for a minimal cost.
“It may sound like TinyPNG only helps in reducing file size, but if you think about the Technical SEO side of the website, it helps to improve both page loading speed and PageSpeed Insights scores.”
The image compression plugin is easy to install on your WordPress website. Instructions are listed on this page. Once installed, you can also switch to a paid account which removes limits and allows you to optimize as many images as you like.
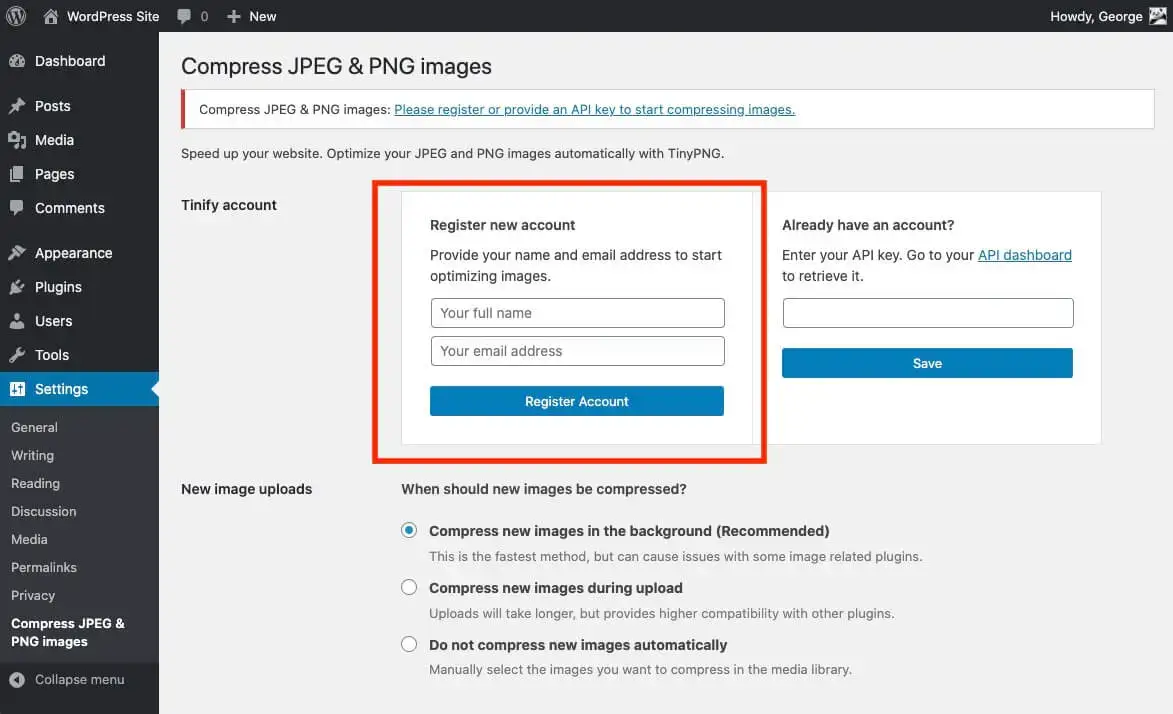
1. Install the plugin and create an account Begin by installing the TinyPNG plugin on your WordPress site. Once installed, go to Settings and click on “Compress JPEG & PNG images”. Follow the instructions to create an account.
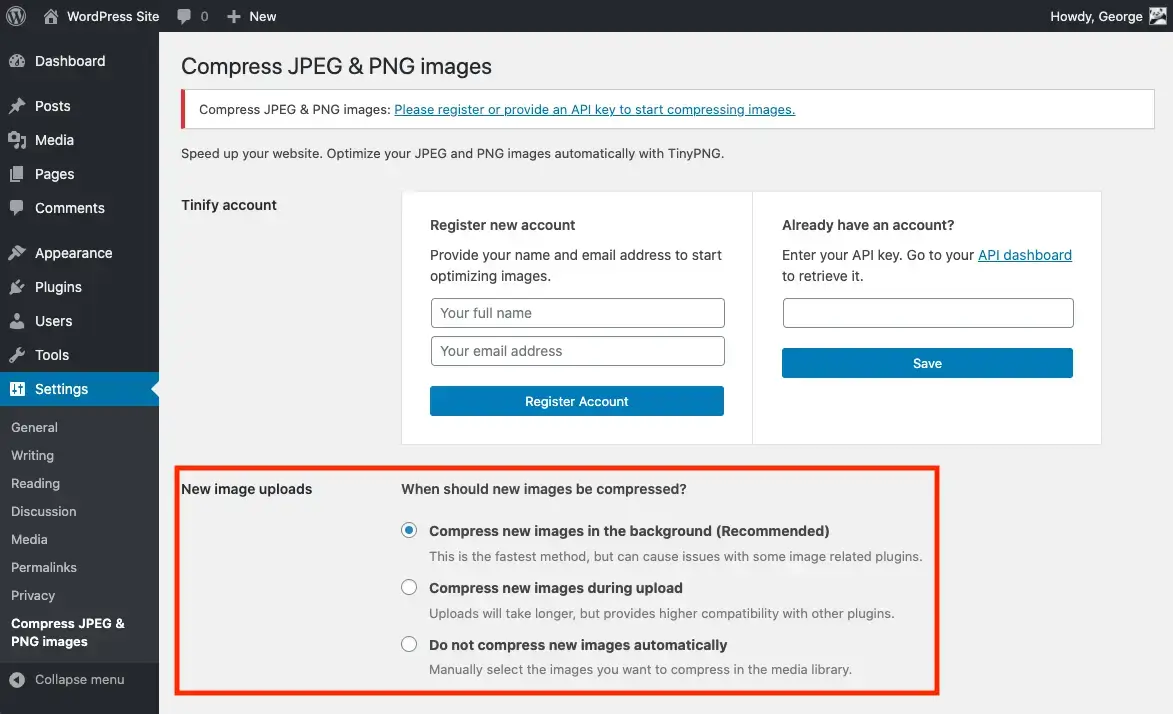
2. Select when newly uploaded images should be compressed You have the option to decide how the plugin should handle newly uploaded images. There are three available options to choose from:
Option 1: Compress new images in the background (recommended) This is the fastest method for image compression and involves automatically compressing your images in the background. However, please note that this option can potentially cause issues with some image plugins.
Option 2: Compress new images during upload The second option is to compress new images during upload. This option takes a bit longer but provides higher compatibility with other plugins.
Option 3: Do not compress new images automatically Lastly, you can also choose not to compress new uploads automatically. In this case, you can manually select the images you want to compress in the Media Library. This is also the recommended option while doing development work on your website.
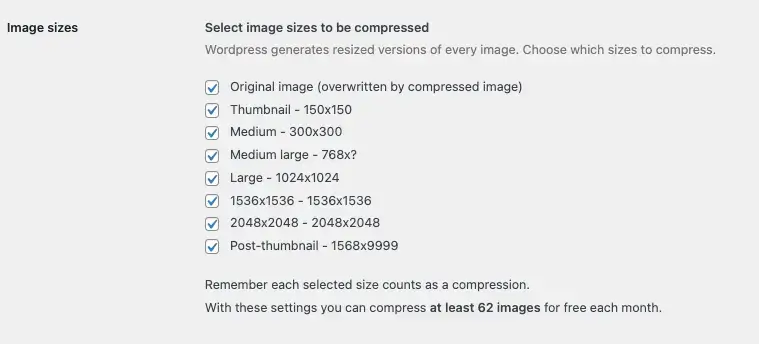
3. Select image sizes to be compressed When you upload an image to your WordPress website, WordPress automatically generates different thumbnail versions of it, which can be seen in the Settings > Media section.
The TinyPNG plugin will compress each of these different sizes of images, which means that if you have 100 images and 5 different sizes, the plugin will perform 500 compressions. To manage which image sizes get generated and compressed by the plugin, uncheck any image sizes that you don’t want to use or compress with the plugin. This allows you to customize the plugin according to your preferences and optimize only the images that are important for your website.
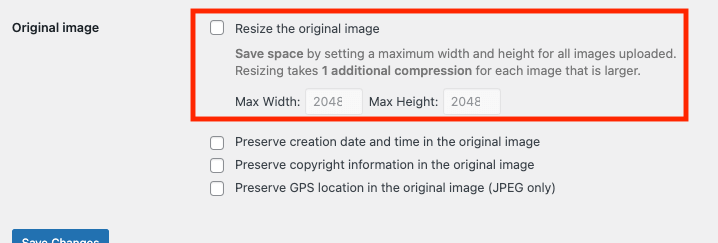
4. Resizing of original images In addition to image compression, the plugin also provides the ability to resize your original images, which can save storage space. Resizing your images involves setting a maximum width and height for all images uploaded to your website. This process takes one additional compression for each image that is larger than the specified dimensions.
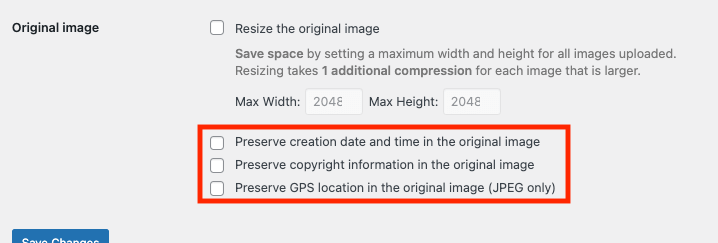
5. Preserving metadata Lastly, the plugin also allows you to preserve certain metadata. If you do not select any metadata to preserve, all data will be removed during the compression process. However, if you want to preserve certain metadata, you can select the specific data that you wish to keep.
6. Save settings After making changes to your plugin settings, it’s important to save your changes to ensure that they are applied to your website. To save your settings, simply click the “Save Changes” button at the bottom of the Settings page.
How to measure the impact of image optimization on blog performance
To understand the full impact of image optimization on your WordPress website, it’s essential to track various performance metrics. Here are some key metrics to focus on:
Page load time: A critical metric that directly affects user experience and SEO.
Bounce rate: The percentage of visitors who leave your site after viewing only one page.
Average session duration: The average time a visitor spends on your site.
Conversion Rates: The percentage of visitors who complete a desired action, such as signing up for a newsletter or making a purchase.
To measure these, you can record your current performance metrics using tools like Google Analytics, GTmetrix, and Pingdom. If you are using TinyPNG, the plugin provides a dashboard showing the total savings and compression statistics, helping you monitor the effectiveness of your optimization efforts.
Once you use an image compression plugin for WordPress like TinyPNG to reduce the file size of your images, you can track the same metrics to see the improvements. Compare page load times, bounce rates, session duration, and conversion rates before and after optimization.
Based on the data, make further adjustments. If certain pages are still slow, check for other factors like server speed or unoptimized code. Continuously monitor and refine your optimization strategy to maintain optimal performance.
LearnWorlds, an online learning platform, had trouble with slow-loading blog pages due to high-resolution images. They tried free tools at first, but they didn’t work well. They used Tinify to automatically compress large images without losing quality, making their web pages load faster:
1. Improved performance: Image sizes were reduced to less than 1 MB, making the website faster and improving Google search rankings. 2. SEO benefits: Faster loading times helped with SEO, leading to better search engine rankings. 3. Easy workflow: Tinify made the optimization process smoother, saving time and fitting well into their workflow. 4. Cost-effective: Tinify was a cost-effective tool for compressing 500 to 1000 images per month.
“In many cases, we are getting very high-resolution images from our design department to upload to the blog. This would mean articles with >3 MB of images if we were to use those.”
The TinyPNG WordPress plugin is a great tool for optimizing your website’s performance by compressing images. It improves page load times, user experience, and SEO without sacrificing quality.
Whether you have a big website or a personal blog, this plugin is easy to use and seamlessly integrates with WordPress. It offers features like automatic compression, bulk optimization, and customizable settings for metadata and resizing.
Start enjoying faster and more efficient image handling on your website by installing the TinyPNG plugin today. If you have any questions about the plugin or feedback, let us know at support@tinypng.com, or find us on Twitter or LinkedIn.
A simple way to boost your website’s performance is by compressing images. Image compression means making image file sizes smaller using lossy or lossless techniques. Smaller images help your website load faster.
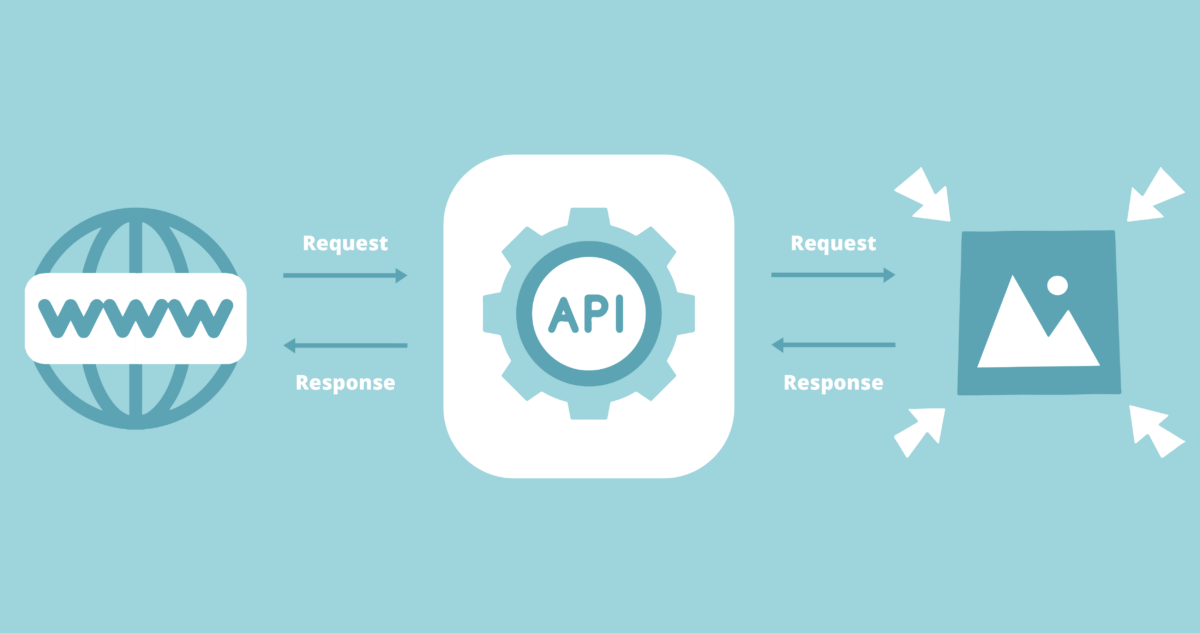
An Developer API is a quick solution to compress a lot of images on your website in no time. Instead of manually uploading all your photos within an online compression tool, an API can do it all at once. It saves you a lot of time and besides, compressed images make your page speed way faster. It has a positive influence on how long users will stay on your webpage. But what is an API and how can you compress images with it?
Website performance is key for small businesses to attract customers. Find out how Tinify’s free image optimization tools can help your website rank higher on search engines.